So you’ve decided to try out telemedicine with your patients. You’ve got your telemedicine solution set-up and ready to go.
Now what? How do you ensure that your virtual patient visits are as successful and effective as your in-person ones? How do you prevent any technical glitches from getting in the way of your medical consultation?
The good news is, many of today’s videochat telemedicine solutions are made to be as simple to use as possible. Think Skype but with complete security and extra features health professionals need – like ePrescribe, visit documentation, and billing.
Still, it’s always helpful to have your technical checklist on hand to head off any potential problems. Here’s our list of 15 telemedicine tips for doctors and providers to help make your virtual patient visits as effective and glitch-free as possible.
1. Use a High Quality Webcam. This one’s a no-brainer. What good is video if it’s not high-quality enough for you to clearly see your patient and any visual symptoms? Plus, when patients can clearly see your face, they’ll be more comfortable and respond more positively to the visit.This doesn’t mean you need to go out and buy a super-fancy camera. Many high-quality webcams today are not very expensive! Check out this list for some great options.
2. Test out all your equipment before you start.Ok, so you’ve got everything set-up. Now, you have to test it out! Before you do your first telemedicine visit, check to make sure your volume’s on, the audio is clear, and your camera and microphone are working. You might even want to do a quick check each morning to make sure everything is working properly.
3. Use Good Sound Equipment. Test out the microphone and speakers on your computer and mobile device. What you have might work ok. If you’re having any trouble getting good audio, though, spring for a high-quality microphone and some speakers. Also, remember that if you’re planning to have multiple staff in the room during a telemedicine visit, everyone will need to be heard.Here’s a great list of desktop microphones and headsets that won’t break your budget.
4. Set-Up Your Camera at Eye-Level. Whether you're using an integrated or external camera, set it up so that the camera is approximately eye-level. That way, it’ll be easier to maintain eye contact with the patient and stay engaged during the visit.
5. Close Unnecessary Programs. Video streaming can take up a lot of bandwidth, so make sure you don’t have too many other programs or tabs open. You might even want to close out of everything and just have your telemedicine platform open.
6. Use a Wired Internet Connection, if possible. A wired connection is less prone to interruptions, so try to use an ethernet cable instead of wifi whenever you can.
7. Plug in Your Computer or Mobile Device if you can. While this isn’t necessary, it’s always a good idea. The last thing you want is for your power to die in the middle of the visit.
8. Find a quiet space. Wherever you are (office, an exam room, or a home study) make sure the space is quiet and distraction-free. Eliminating distractions and ensuring patient privacy is crucial to a high-quality telemedicine visit.
9. Read the patient complaint beforehand, if possible. Just like any other visit, try to take a minute before starting the visit to read the patient complaint and familiarize yourself with the patient record. You'll be more prepared for the visit and will likely make the appointment more efficient.
10. Adjust the lighting. The lighting in your space can have a big effect on the quality of your video. Pro tip - try turning on overhead lights and blocking light from windows, which can lead to too much background light in the video.
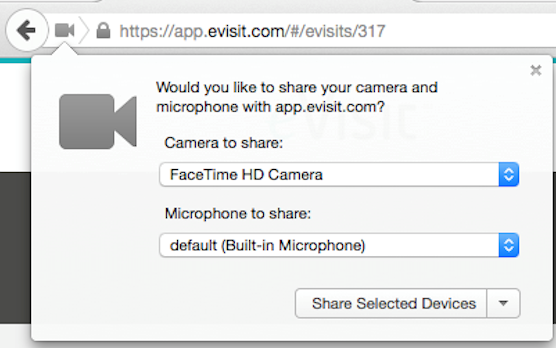
11. Share your screen when prompted. Most any app that’s accessing your webcam needs to request permission. For example, in the eVisit platform, you’ll see a pop-up in your browser like this that prompts you to allow sharing of your camera:
When a physician or patient’s video isn’t working, the number one reason is that they haven’t allowed access to their camera. So, make sure you do this step!
12. Have the support team's number easily accessible. Hopefully, you won’t need this number most of the time. But technical problems do come up sometimes. Write down the support team's number and place it somewhere easily accessible in your workspace. Make sure you share it with your staff as well, so they can coordinate calling for help when you’re busy.
13. Follow the same clinical guidelines you would with an in-person visit. You know the drill. Even if you can't do a physical exam, you can ask good questions and take a thorough history of present illness. While the technology and interaction is different, the key clinical guidelines apply to a virtual visit the same way as a physical appointment.
14. Stay Engaged. Again, treat the virtual visit like you would an in-person visit. Try to maintain eye contact and nod along to show you’re listening. If you need to take notes or look at something, mention that you’re doing so to the patient –they may not be able to see exactly what you’re doing, and taking notes could just seem like you’re distracted or not engaged in the visit.
15. Explain Next Steps. Once the visit's over, thank the patient for doing a virtual visit and explain what they need to do next (this could be picking up their electronically prescribed medication from their nearest pharmacy, or scheduling a follow-up appointment in the next month).This is also a great opportunity to ask the patient what they thought of the virtual visit process, if this was their first one. With that feedback in hand, you'll continue to make your virtual visits more successful!
Those are our top telehealth tips for providers doing patient visits online. Feel free to print this out and use it as a checklist for yourself or other staff as you start your telemedicine program!
Did these tips for telehealth work for you? Do you have any other helpful suggestions that we’re missing?


